Web app 101—frontend/backend/deployment
Today, we will be writing a simple Python interpreter web app. We will not only write the app from scratch but also will deploy the web so that we can access it from a web browser.
What is a web app
Web app is any application that runs on a web server so that people can access through a web browser. Typically, a web app is dynamic in nature, i.e., different viewers will see different contents of the same app.
The big picture
The focus of the article is to show you how a typical web app works under the hood. A web app typically consists of two components: a frontend and a backend.
The frontend is what the user interacts with, i.e., the web interface. The frontend code consists of html, css, js files along with other data, such as images.
The backend works behind the scenes and is responsible for the core logic. The user will never interact directly with the backend — one must always go through the frontend to interact indirectly with the backend.
The two communicate through messages. Below diagram depicts how these components interact
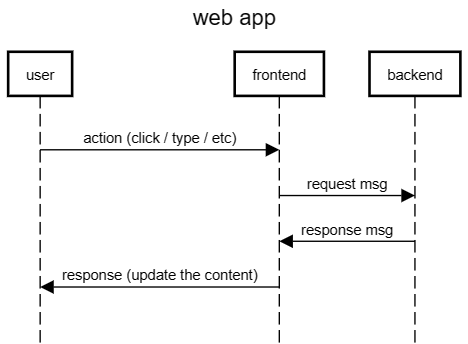
For example, a user clicks on a link that says next page. The frontend then sends a request to the backend asking for the content for the next page. The backend complies and sends over the next page content to the frontend, from which the frontend renders the next page and updates the web page.
Tech stack
The frontend is always html, css, and js files. Either one writes those files manually or writes in some other language/framework that will create the necessary html/css/js files. For example, you can write web frontend with Flutter (dart language) and compile to html/css/js. For today, we will write a single index.html file.
The backend can be written in anything. Hack, you can write in assembly if you want. Some popular choices are Python, NodeJS, Java, Ruby, and C#. We will write in Python.
Serving
Once the code is ready, we need to serve the users. We can’t just save the files and share publicly. We need a program that responds to requests from browsers by delivering webpages, images, stylesheets, and other assets. The most popular such programs are Apache and Nginx. We will use Nginx.
Deployment
We need a system to run the server. It involves setting up the infrastructure, configuring the server, and making the website live. The best practice is to containerize everything into an image and deploy with Docker or Kubernetes. We will use Docker.
Now let’s start writing
Now that we have covered different aspects involved, let’s start writing. As I mentioned in the beginning, we are going to build a Python interpreter web app.
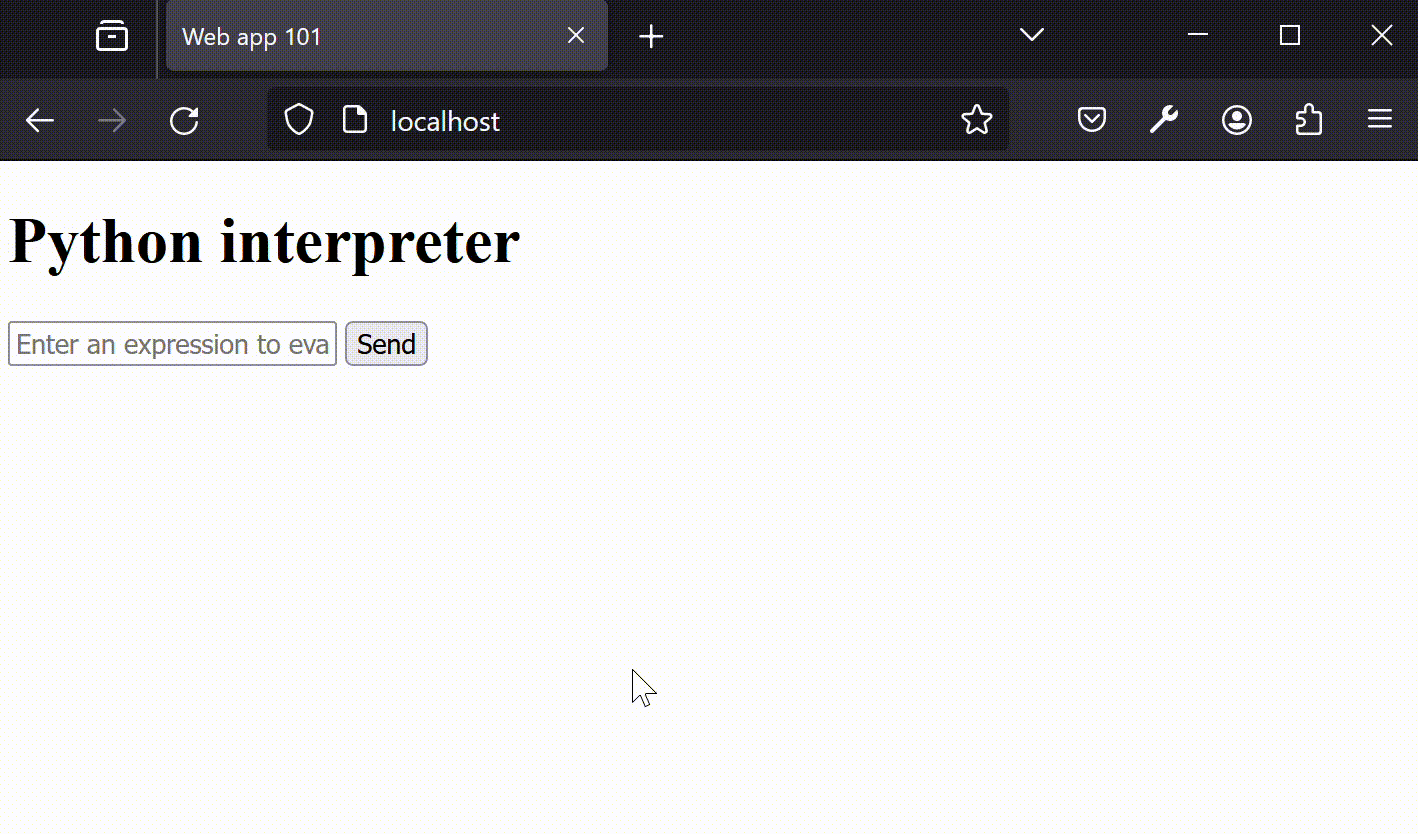
Frontend UI
- has a text box for the user to fill in the expression to evaluate
- has a button to run
- has a text area to display
Frontend logic
- upon click of the button, send a HTTP POST request to the backend server with the expression as content
- show the user the response from the backend server
This is as minimal as it can get. You could probably ask ChatGPT to write a single html file for this too. Here is index.html I have
<!DOCTYPE html>
<html lang="en">
<head>
    <meta charset="UTF-8">
    <meta name="viewport" content="width=device-width, initial-scale=1.0">
    <title>Web app 101</title>
</head>
<body>
    <h1>Python interpreter</h1>
    <input type="text" id="expression" placeholder="Enter an expression to evaluate">
    <button onclick="sendRequest()">Send</button>
    <p id="response"></p>

    <script>
        function sendRequest() {
            const endpoint = "/evaluate"
            const expression = document.getElementById('expression').value;
            fetch(endpoint, {
                method: 'POST',
                body: JSON.stringify({
                    expression: expression
                }),
                headers: {
                    'Content-Type': 'application/json'
                }
            })
            .then(response => response.text())
            .then(data => {
                document.getElementById('response').textContent = data;
            })
            .catch(error => {
                console.error('Error sending request:', error);
            });
        }
    </script>
</body>
</html>
Backend
- listen for a POST request
- perform Python expression evaluation and respond with the output string
Again, this really simple. I am going to utilize flask package, but this can be easily written with built-in http module too. Below is app.py for the backend
from flask import Flask, request, jsonify

app = Flask(__name__)

@app.errorhandler(Exception)
def error_handling(e):
    return str(e)

@app.route("/", methods=['POST'])
def get_client_ip():
    msg = request.json
    return str(eval(msg["expression"]))
Nginx config
There is some complication when a web server (frontend) wants to fetch data from an external source. We won’t go into this here, but this requires us to configure Nginx server to enable a reverse-proxy. For that, we need this default.conf file.
server {
    listen       80;
    server_name  localhost;

    location / {
        root   /usr/share/nginx/html;
        index  index.html index.htm;
    }

    location /evaluate {
        proxy_pass http://localhost:8080/;
    }

    error_page   500 502 503 504  /50x.html;
    location = /50x.html {
        root   /usr/share/nginx/html;
    }
}
Here, we are defining proxy_pass that relays any messages sent to /evaluate endpoint to http://localhost:8080/, which will be our backend server endpoint.
Dockerfile
Finally, we need Dockerfile. This defines how to build an image. For simplicity, we will put the frontend and backend in the same image. In practice, this is discouraged.
from nginx:alpine

RUN apk add python3 py3-pip
RUN pip install flask
COPY web-server/index.html /usr/share/nginx/html/
COPY backend-server/app.py /app/
COPY default.conf /etc/nginx/conf.d/default.conf

WORKDIR /app/
CMD sh -c "flask run -p 8080 -h 0.0.0.0 & nginx -g 'daemon off;'"
File structure
Make sure you have the same file structure as below.
├── Dockerfile
├── backend-server
│   └── app.py
├── default.conf
└── web-server
    └── index.html
Let’s build this image
docker build -t web-app .
and run the container.
docker run --rm -p 80:80 web-app
Finally, open up a web browser, go to localhost, and you should see the web app we just built!
You can find the full source code here.